Blog
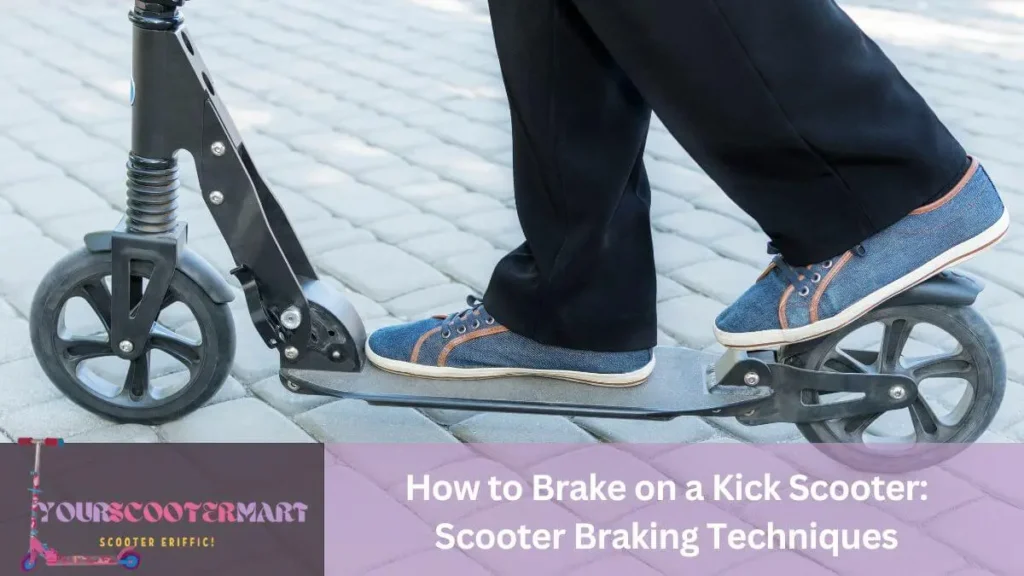
How to Brake on a Kick Scooter: Scooter Braking Techniques
Improve your control and safety by learning how to brake on a kick scooter. Learn from the expert tips about the various types of brakes and effective scooter braking methods for assured riding.

Introduction
Braking correctly on a kick scooter is an important skill to master in order to ensure your safety. In this guide, you will learn the basics how to brake on a kick scooter, as well as some advanced techniques.

The most common way of scooter braking is using the foot brake, which can be applied in two ways: by shuffling your feet back and pushing down on the brake lever, or by putting pressure directly on the back wheel with your foot. Additionally, you can also slow down gradually by coasting or using more extreme braking techniques such as skidding or dragging your feet. Other types are Hand brakes, disc brakes, and V-brakes.
Understanding all these techniques will help you become a confident and safe rider.
Types of Brakes
Kick scooter riding can be a convenient and enjoyable form of transportation, but it’s crucial to know how to brake safely to prevent collisions. It’s crucial to comprehend the numerous braking mechanisms available on a kick scooter and how to apply them skillfully whether you’re a novice or seasoned rider.
It might be enjoyable and practical to go by kick scooter, but it’s crucial to know how to brake safely to prevent collisions. Understanding the various braking methods available on a kick scooter and knowing how to utilize them efficiently is crucial whether you’re a novice or seasoned rider.
There are two main types of brakes that can be found on kick scooters: hand brakes and foot brakes.
They typically mount hand brakes on the handlebars of the scooter, while foot brakes are usually mounted at the rear wheel of the scooter. Let’s take a look at the types of scooter brakes:
- Hand brakes
- Foot brakes
- Disc brakes
- V-brakes
How to Brake on a Kick Scooter Using Hand Brakes
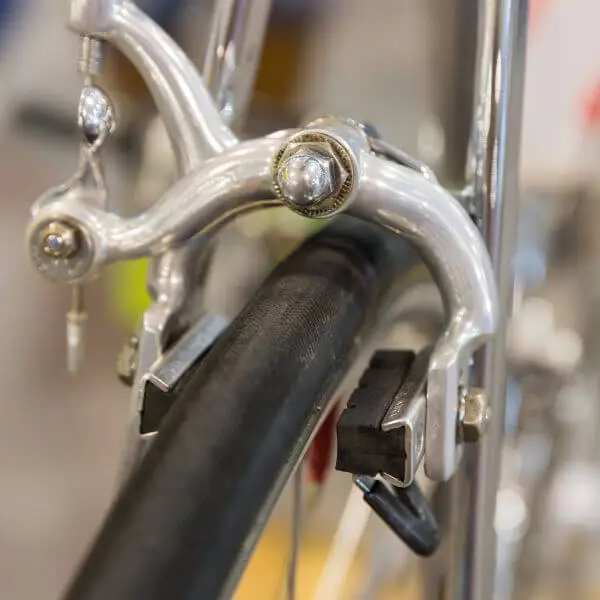
The kick scooter hand brake is the most commonly used scooter braking system. The rider’s right hand usually operates it, although there are models that have a left-side option. A kick scooter hand brake typically consists of a lever mounted on the handlebars and a cable that connects to the wheel. When you squeeze the lever with your fingers, the cable pulls on either steel or plastic wheel nuts, which tighten against the rim of the wheel and cause it to turn more slowly or come to a complete stop.

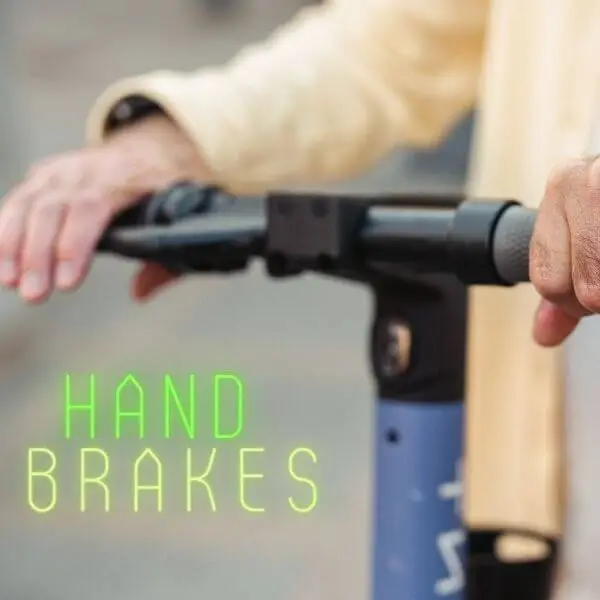
In most kick scooters, there will be two brake levers–one for each wheel. Depending on your scooter model, they may also have different levels of force required to activate them–one being more sensitive than another. If you’re just starting out kicking, it can be helpful to use some trial and error in order to find out what level of force feels best for you when using each individual lever. It can also be beneficial to practice using both brakes together in order to quickly slow down or stop.
Advantages of Hand Brakes
- Increased control: Hand brakes give the rider more control over the scooter, enabling a softer, more controlled stop.
- Safety: Since hand brakes offer a backup braking technique in the event that the feet tire or fail, they are generally thought to be safer than just using foot brakes.
- Versatility: Hand brakes are useful in a range of riding situations, including descending hills, stopping quickly, and negotiating tight corners.
- Confidence: The additional control and safety that hand brakes provide can boost a rider’s confidence, enabling more carefree and joyful riding.
- Convenience: Engaging the brake with a hand brake simply requires a slight push of the lever.
- Durability: Due to their reduced susceptibility to wear and tear from continuous usage, hand brakes are often more durable than foot brakes.
How to Brake on a Kick Scooter Using Foot Brakes
Foot brakes are the most common type of brakes on kick scooters. The scooter foot brake is located near the rear wheel, and you’ll press down with your foot to slow or stop your scooter. Foot brakes are great because they don’t require any setup or maintenance and they provide great stopping power when used properly. Before you use a foot brake, make sure it’s in good working order. Check that the connection to the wheel is secure, that all parts are in place, and that there’s no excess wear on any of the components.

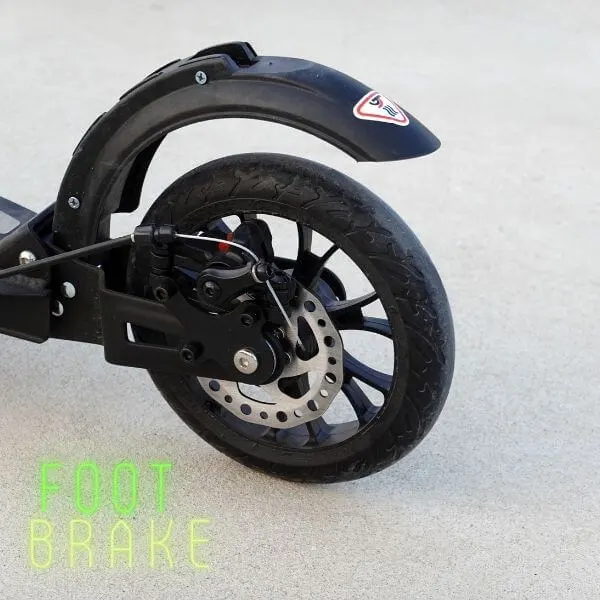
When you need to stop using a scooter foot brake, position your feet so that their weight evenly drives down onto the brake pads. Don’t go too hard as this can lock up your wheels so that you suddenly lose momentum or can even skid sideways if you have a rear-wheel drive scooter. Instead, push steadily until you achieve the desired braking effect without causing any skidding or drifting.
Advantages of Foot Brakes
- Simplicity: For people who are new to riding kick scooters, foot brakes are a fantastic alternative because they are easy to install and maintain.
- Cost-effective: Foot brakes are a more affordable option because they are normally less expensive than hand brakes.
- Lightweight: Foot brakes only add a small amount of weight to the scooter, making it lighter and easier to handle.
- No skill requirement: Foot brakes don’t require any special knowledge or abilities to operate, making them appropriate for riders of all ability levels.
- Convenient: Foot brakes are easily accessible and don’t take up any handlebar space.
- Foot activation: Riders may swiftly and simply shift their weight onto the foot brake to engage it, which provides powerful stopping force right away.
How to Brake on a Kick Scooter Using Disc Brake
Disc Brakes are also a type of brake found on kick scooters. A disc brake works by activating two parallel brake pads that press onto either side of a rotor mounted to the wheel of the scooter. This generates friction and slows the rotation of the wheels.

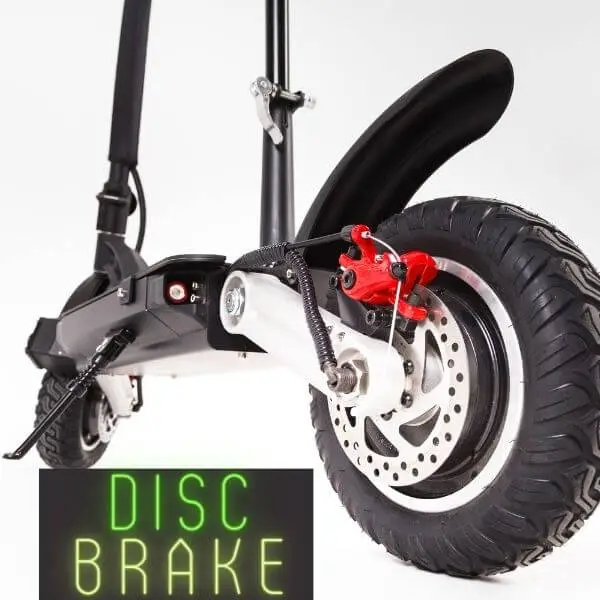
Disc brakes offer superior performance in dry conditions, but tend to fade when wet due to reduced grip on wet surfaces. An additional benefit of disc brakes is their modulation, meaning you have better control over how much braking power is applied. This can be very useful if you need to adjust your braking power depending on the terrain or conditions.
Advantages of Disc Brakes
- Increased stopping power: Disc brakes provide a higher stopping power than other types of brakes, enabling a quicker and more efficient stop.
- Consistent performance: For riders who need dependable brakes, disc brakes are a fantastic option since they deliver consistent performance in all weather conditions, including rain and mud.
- Durability: Disc brakes typically last longer and are more durable than other types of brakes, requiring less frequent maintenance.
- Better control: Disc brakes provide better modulation and control, making it simpler to smoothly slow down or stop.
- Low maintenance: Compared to other brake types, disc brakes often require less maintenance, which lowers the cost and effort needed to keep them in excellent operating order.
- Versatility: Disc brakes are a versatile alternative for riders since we may employ them in a range of riding circumstances, including steep terrain, fast speeds, and large loads.
How to Brake on a Kick Scooter Using V-brakes
V-Brakes can be effective for adults on kick scooters. To get the highest level of braking effectiveness, it’s critical to make sure the V-Brakes are correctly adjusted and in good condition. To guarantee the best braking performance, riders should select brake pads that are suitable for their weight and riding style.

V-Brakes are frequently found on electric, commuting, and recreational kick scooters and they can have air-filled or solid tires. They are a flexible option for varied riding styles and riding environments because they function well with a variety of tire widths and tread patterns. However, because different materials have varying amounts of friction and might impact the overall braking performance, it’s crucial to select the right brake pads for the particular tire type.
Kick scooters frequently have rim brakes known as V-Brakes. They function by using two brake arms that, when the brake lever is engaged, clamp onto the wheel rim. V-Brakes are a well-liked option among scooter riders who value control and safety above all else because of their powerful stopping ability. They are a practical option for scooter users who ride for both leisure and commuting because they are also rather simple to maintain and repair.
Advantages of V-Brakes
- Cost-effectiveness: V-brakes are frequently less expensive than other brake types, making them an affordable choice for riders.
- Simple installation: V-brakes are frequently simple to install and maintain, requiring little tools and knowledge, making them an excellent alternative for riders new to scootering.
- Lightweight: V-brakes are lightweight, thus they are less prone to add unnecessary weight.
How to Brake on a Kick Scooter by Dragging Your Feet (Only in an Emergency)
On a kick scooter, dragging your feet to brake requires dragging the bottoms of your shoes on the ground to slow down or stop the scooter. This can be a reliable way to slow down or stop a kick scooter, particularly in an emergency or when the hand brakes are malfunctioning. Dragging should only be used as a backup method because it is less dependable and effective than using hand brakes. Additionally, if the area you are riding on is wet or slick, it can be unsafe and quickly wear out the bottoms of your shoes. On a scooter, I usually advise it to use the hand brakes as the main braking mechanism, additionally to only drag in desperate situations.
In order to get the most out of these brakes, it’s important that they are regularly inspected and maintained as worn-down brake pads or contaminated discs can reduce performance significantly. All these methods can also be applied for pro scooter brakes.
Setting Up Your Brakes
If you plan on riding a kick scooter, it is essential to know how to set up your brakes correctly. These brakes have their own advantages, so it’s important to understand how they work and what type will work best for you. Now, we will go over how to set up the foot brake, the hand brake, the disc brake, and the V-brake on a kick scooter.
Adjusting Hand Brake
The most important part of riding a kick scooter safely is having complete control of your brakes. The biggest factor to consider when adjusting your hand brakes is the amount of “stopping power” they provide.
Before you begin, make sure that the brake cables are connected properly to the brake arms. Once this has been done, it’s time to adjust the handbrake.
- Start by loosening the nut on top of each cable and then pull it out until you have roughly 4-5 cm (1-2 inches) of exposed housing after the head of each cable passes through its slot.
- When performing this adjustment, be sure to hold on to both ends of the cable and pull in opposite directions from one another–never one end at a time, or else it will cause misalignment within the housing and fray your cable faster than normal.
- Tighten down each nut securely after pulling them into this position, but do not over-tighten as this can damage your brakes.
- Next, squeeze each brake lever until it reaches its stopping point–make sure both sides are symmetrical with the same amount of tension in their springs.
- If necessary, you can adjust their sensitivity further with a hex wrench on either side; raising or lowering these screws will allow for less or more leverage as needed when coming to a stop.
- Lastly, turn your locking nuts back into place so that they do not come unscrewed during use–make sure they are secure but not overly tight so that they do not strip out or crack over time.
And now you should be all set!
Adjusting Foot Brake
Adjusting your scooter foot brake is an important part of setting up your kick scooter. This is especially true if you are using it primarily to brake on hills or at higher speeds. In order to adjust your foot brake, you will need to make sure that the cable that runs from the brake lever to the braking point is secure and tight.
- Check that the nut and bolt at the top of your fork are secure. This secures the end of the cable where it connects to the brake lever. You can then pull gently on these nuts until they have a secure hold.
- Check that your brakes are adjusted in a way so that when you press down on them, they have a firm grip on both front and rear wheels simultaneously. You can adjust this by adjusting each brake separately with their respective adjusting screws (sometimes called tensioners). Loosen each screw slightly until there is enough grip without causing any drag when not braking.
- Finally, check that the cable has enough slack so as not to cause tension when pedaling, but not too much slack where it becomes loose or rattily while riding. Tweak one adjustment screw until you find what works best for you and tighten up all screws afterward with a wrench or spanner if necessary.
Keep these tips in mind when adjusting your foot brakes–if done correctly, then this should help increase your stopping power when needed!
Adjusting Disc Brake
Disc Brakes are great for downhill riding, as they are more efficient at stopping than basic scooter brakes. However, it’s important to understand how to adjust them correctly to get optimum performance from them. To get the best from your brakes, you need to set up a disc brake caliper (the brake unit), the hose length, and the bite point (where the pad contacts the rotor).
- First, make sure you mount your caliper to a suitable place on your scooter. Generally, this is just behind the forks and you should firmly attach it with screws or bolts into pre-drilled holes.
- Check all parts are securely fitted and have no signs of excessive wear or damage.
- Now fit your brake pads and make sure they’re securely held in place against the rotor.
- Next set up a brake hose, which is designed to transfer hydraulic pressure from your bars to the caliper via flexible tubing. The correct length of the hose ensures even force throughout the travel lever-making it easier for you to control the braking power generated by your bottom pressure on the lever.
- Ensure there’s enough slack in between brake components so that when handlebars are turned fully, it doesn’t generate over-tension on tubing, resulting in water-type leakages.
- Finally, adjust Bite Point (where pads make contact with the rotor) by pushing down the lever until the pads just touch the rotor. The force required to push down the lever should be relatively low for sensitive control over braking power.
- After adjusting, you may feel some resistance near the end of lever travel. This simply means spring tension needs readjustment.
- Once all this is done correctly, tighten all bolts firmly and run through a visual check before going out riding.
Now enjoy smoother stops using a well-adjusted disc brake system!
Adjusting V Brakes
The following is a simple how-to for installing and adjusting V-brakes on a kick scooter:
- Place the brake pads in place: Using the given fasteners, fasten the brake pads to the brake arms. Ensure that the brake pads are properly positioned so that they make contact with the wheel rim.
- Putting in the brake arms: Make sure that you mount the brake arms on the scooter’s fork or frame and that they are parallel to the wheel.
- Put the brake cable in place: Using the cable anchors, run the cable from the brake lever to the brake arms.
- Adjust the brake pads: Make sure you positioned properly the brake pads evenly on the wheel rim so that they fully contact the surface when the brake lever is used.
- Adjust the brake cable: By tightening the brake cable with the barrel adjuster, you can ensure that it has sufficient tension to stop the wheel when the brake lever is applied.
- Check your brakes: To ensure the wheel stops smoothly and effectively, test the brakes by lightly applying pressure to the brake lever. Continue making adjustments until you are happy with the brakes’ performance.
The precise procedure for installing and adjusting V-brakes may vary based on the particular scooter model and its parts. For comprehensive instructions, I advise it to refer to the manufacturer’s instructions.
Braking Techniques
Knowing how to brake on a kick scooter is essential for safety and to prevent any potential accidents. There are a few different braking techniques that you can use, depending on the type of scooter you have. This includes using the hand or foot brake, or the disc brake. Each different braking technique will have its own unique advantages and disadvantages, but in the end, you need to choose the one that is right for you.
Let’s discuss the different braking techniques available to you:
Hand Brake Braking
We know the traditional technique of stopping a kick scooter as hand braking. This requires pushing the handlebar deck down at an angle to create friction, which helps bring the scooter to a stop. This method is safe and effective, but it does rely on using your own strength. Increasing resistance with your non-dominant hand can slow down faster or allow you to adjust your speed without stopping abruptly. As long as you are not putting too much pressure on the deck and handlebars, this is one of the most common braking techniques used by kick scooter riders.
We should also take other important preventive measures when using kick scooters, such as:
- Wearing proper safety gear such as helmets and protective pads.
- Ensuring that you have visibility in low-light conditions with reflective clothing or active headlamps.
- If possible, plan out your route prior so that you do not need to make sudden stops due to an unexpected turn or intersection ahead.
Foot Brake Braking
Foot Brake Braking is one of the safest and most effective methods of braking on a kick scooter. It requires you to use your foot to press down on the brake lever located at the rear of the scooter. This lever typically works by gripping or pinching a metal disk attached to the rear wheel, which in turn causes friction and slows you down. When using this method, it is important to remember to keep your feet firmly on the baseplate so that you do not lose balance as you stop. If there is no brake lever available, simply pressing down with your heel on the back tire can work as an emergency brake.
It is also essential that when applying any kind of foot brake braking; you do so lightly at first, otherwise you can cause skidding which can be dangerous and damaging to both your scooter and yourself! When learning how to use foot brakes, it may be helpful to:
- Practice in an open area such as a car park or empty field until you get used to how much pressure it takes for your scooter’s brakes.
- Once this is mastered, you will be able to brake safely and enjoy more intense tricks as breaking correctly is vital for performing many advanced kick scooter tricks!
Disc Brake Braking
Disc brake braking is a type of brake technology typically found on mountain bikes, but is also becoming increasingly popular on kick scooters. When applying brakes, the rider squeezes two levers together, which activates the disc brake caliper and causes friction on the rotor, which serves to slow or stop the vehicle.
Unlike mechanical drum brakes and other traditional braking methods, disc brakes do not suffer from wear and tear due to constant use and have greater stopping force. The use of this type of brake requires adequate space as it occupies valuable real estate on your handlebars. Additionally, disc brakes tend to be more expensive compared to traditional configurations and require regular maintenance–such as tightening disc screws periodically–to ensure maximum performance.
Maintenance of the Scooter Brakes
A kick scooter is a great way to get around, but it’s important to remember that brakes need to be maintained regularly in order to stay in good working condition. This maintenance can involve checking the brakes for wear and tear, checking the brake pads and discs, and ensuring that all components are properly lubricated.
Let’s look into more detail about the maintenance of your kick scooter brakes:
Cleaning and Lubricating Brakes
Ensuring that your brakes are working correctly is an essential part of keeping your kick scooter safe and capable. Regular cleaning and lubrication of the brake components can reduce the need for frequent repairs and replacements.
Cleaning:
You should routinely clean the brake to remove dirt or rust. Start by using a clean, dry cloth to wipe away any debris or rust that has built up on the surface of the braking system. If the area is especially dirty or corroded, use some soap and water to clean off any grime. Allow everything to dry completely before moving on to lubricating.
Lubricating:
Once all surfaces are clean, it’s time to lubricate the brake assembly with a light oil-like lubricant spray or silicone grease. Applying just a few drops of oil directly onto both sides of the tire will help ensure consistent friction between the wheel and caliper when braking. Be sure not to over-apply as too much will create an excess amount of smoke which can cause wear on other parts in the braking system. Finally, spin the wheel for at least 5 seconds after oiling for the best results!
Checking for Wear and Tear
Regularly check for wear and tear on your kick scooter brakes. Before every ride, ensure there are no cracks, rust, or significant gaps in the brake pads or around the brake cable. If you notice any areas of wear, contact a professional mechanic to have them inspected and potentially replaced before riding.
Additionally, check the hardware that connects your brake to the wheel axle and scooter frame for signs of weakness. Make sure those screws are secure and not corroded. If so, tighten them with a head screwdriver if possible. Remember that it is essential to regularly inspect your scooter’s brakes if you want to ride safely and avoid accidents.
Replacing Brake Pads
Replacing your brake pads is key to keeping your scooter at peak performance. Over time, the pads become smoother, thinner, and more worn out. When this happens, it’s necessary to replace them with a new pair. Take care to ensure the quality of your pads is up to safety standards since you will be relying on them for efficient braking.
To replace the brake pads on your kick scooter:
- Turn it onto its side or upside down so that it’s easier to access the brakes.
- Unscrew or remove the old pads from their housings.
- Install the new ones in their respective housings until they are secure and in place.
- Spin each wheel separately and test each pad contact area against both sides of the tire to make sure they’ve been installed properly (it should sound like a rubber-type contact).
- Adjust screws as needed until contact areas are even with each side of each wheel tread; when finished adjusting, insulate any exposed parts with electrical tape or similar material for added safety and protection against moisture damage.
- Screw on lock nuts tightly and check once again for proper fit and positioning of brake pads against tires for safeguarding your feet when braking.
Remember that the quicker you need to brake, the harder pressure you will need to apply to make sure you stop quickly and safely. Make small test stops when required and increase pressure accordingly until you are traveling at a safe speed anytime you move across different surfaces or terrain. Listen for any grinding noise from the wheels indicating friction or wear, likewise be alert for any loss of braking power or handlebar vibrations which could indicate worn-out brake pads or parts needing replacements.
If you adjust and maintain the scooter brakes regularly then you will never have a problem that your foot brake or hand brake is not working.
With practice, confidence in your kick scooter braking will come with time–just remember to stay safe while doing so!
Pingback: The Complete Guide To Knowing The Parts Of A Pro Scooter
Pingback: Top 10 Best Pro Scooter Tricks For Intermediate Riders
Pingback: How To Teach Your Kids To Ride A Scooter| 6 Brilliant Suggestions - Yourscootermart
Pingback: Scooter Maintenance: Tips To Keep Scooter In Top Condition
Pingback: DIY Electric Scooter How To Convert Kick Scooter To Electric
Pingback: How To Store A Scooter: Ultimate Guide For Proper Storage
Pingback: 2 VS 3 Wheel Scooter: Which One Should You Choose?
Pingback: Buying Guide| How To Pick The Best Pro Scooter For 2023